Hendersonville, North Carolina ~ 828.785.2389

Showing posts with label Board and Batten. Show all posts

March 04, 2013

Simple Board & Batten | Hendersonville, NC Photographer

Thought I would share a fun little weekend project with you today that we completed last week.
 
This is our very plain and boring entryway.  One thing that I really don't care for about this house is the split level entry.  But there are lots of other things that we do like about the house, so we deal with the entry.  The one good thing about it is that it has this good sized wall that was screaming for some fun and functional wall treatments!
 

If you have been reading this blog for long, you know how we love wainscoting.  We installed it in our home in Ohio before we sold it, we have beadboard throughout our kitchen and master bath here, and board and batten in our family and dining rooms.  I love the crisp clean white lines. 
It can really brighten up a room and add a lot of interest.
 
So we decided that this wall could use some board and batten with a little twist!
We wanted to add form AND function to this busy little area of our home. 
 
We started by measuring our area and deciding on the height and width of everything.  Then we headed to Home Depot to purchase our materials.  We use MDF for board and batten.  We had a couple of pieces left over from our family room project, so we only had to purchase a small 2' x 4' piece of MDF for this project which cost less than $10. 
 
For a little more detail on how to install board and batten, check out this post.  The one thing we did different this time was go to Home Depot with our measurements in hand and have them cut our pieces for us.  They usually give me a little attitude when I ask them to cut things for me, but I just wait out their attitude, and eventually they cut the wood for me.  For our family/dining room project, I managed to get them to make around 80 cuts!  Needless to say, that guy wasn't too happy with me.  But per their policy, there is no limit on the number of cuts.  They can charge you $.25 per cut after the first three cuts, but they never do.  Even if they did, it would be worth the extra money to have them cut all of the pieces and not have to do it at home. 


Once we had all the pieces cut and ready to go, we broke out our nail gun and installed everything.

 
When my girlfriend and I hung the board and batten in Ohio, this nail gun gave us fits.  When Dennis and the boys hung all the board and batten in this house, the nail gun worked fine.  When Dennis and I hung this board and batten, the nail gun gave us fits again.  My nail gun hates me!
 
 
A little evidence of it's hatred for me. 
It kept shooting holes into the wood, but no nails!
 
 
Or it would shoot the nail, but only 1/4" into the wood.
 
 
Or it would just destroy my little piece of trim.

 
But in the end, we won and all the MDF was secured to the wall!
 

The other thing that is a little different this time is this little extra row of boxes along the top.
Again, these boxes are for both form AND function.

 
After nailing everything to the wall, I had to go through with a nail set and fix a few nails that didn't sink all the way into the wood.
 
 
Once all the nails were sunk, it was time to fill in all the holes and cracks.  The is the stuff that goes on pink and turns white when it's dry.  I used a spackling knife to fill the nail holes and had to use my finger to fix a couple of cracks.
 
 
Again, more evidence of the fun we had with the nail gun.  LOTS of holes to fill!
After everything turned white, I used a little sanding block to sand down all the rough edges and get ready to paint.
 
 
Luckily I was able to repair this cracked trim piece with the spackling.  After it's painted, you won't be able to tell it was cracked.
 
 
Then it was time to paint.  I didn't take any pictures of the painting.  I figure that was pretty self explanatory.  I used Valspar paint in a satin finish to finish everything off.
 
 
Next came the function part of this treatment. 
 
COAT HOOKS!
 
Coat hooks that are at munchkin height!
 

The main reason for this whole project was to have a place for the kids to hang their coats and book bags when they come in.  That's the reason we added the extra row of boxes.  Gives us room to hang more coat hooks.


The kids were surprisingly excited about having these coat hooks!


It's so hard to get a good picture of this area.  It's too narrow to get a full picture of it, so I shot it from above so you could see the entire thing.
 
Eventually I plan to paint/stain the stairs and railing.  A project for another day!


I also wanted to share a couple of pieces of inexpensive artwork that I hung/propped here.
 
First is this little chalkboard that I bought at the dollar store and wrote a little welcome note for our guests.  Chalkboards are so popular right now!
 
Secondly is the go on an adventure print.  That is just a greeting card that I found in the dollar bin at Michaels.  I taped it to a piece of color card stock and put in a frame that I bought on clearance for $2 at Target.  I did opt to remove the glass from the frame.  This is such a busy spot, with people walking through it multiple times a day, and kids throwing their stuff around, that I was afraid that it could get knocked down and someone get hurt.


Another piece of inexpensive art. 
I took 3 or 4 colors of sample paint that I have and brushed it randomly onto a 16x20" canvas.
Easy!

 
Everything besides the chalkboard is just propped against the wall on the little ledge.
Makes it super easy to switch things out when I get bored with whats there.


So there you have it.  An easy & inexpensive little weekend project.  We spent around $30 to complete this.  We only had to purchase the small piece of MDF and the coat hooks.  We had the nails, spackling, and paint on hand already.
 
We are super excited with how it turned out!  It not only serves a purpose with keeping coats and bags off the floor, it also adds interest and color to that formerly very boring and blah space.
 
So what have you been working on.  Any fun weekend projects in your house?  Do you love wainscoting as much as we do?  Have you been making any inexpensive DIY art?  Please do share!

I'm also linking up to a fun little linky party today. You can check out more fun projects here.
 
TDC Before and After


July 25, 2011

Family Room Makeover Part II | Sunbury Photographer


Part II of the family room makeover.
Click here to see the installation of the board and batten.


As you can see, I had a little trouble deciding on a color. If I knew for sure we were going to be staying here, I would have painted an aqua-ish color. But since we are going to be putting it on the market to sell, I felt like an aqua family room might not be the best move. I see lots of yellow family rooms in friends and family’s homes. So I figured it would be a better color choice to appeal to the majority of people. But then, I had a horrible time deciding what shade of yellow to use. Something cheery, but not blinding. Something airy and light, but not to close to just being an off white or cream color. So I had many yellow swatches hanging trying to decide. Then one day I came across some little berry type things on a flower arrangement that were the perfect color. So I took that and matched to it the color swatches at Home Depot. The color I ended up choosing was Provence Cream by Behr. It turned out exactly as I wanted.
 Light and airy, cheerful, colorful, but not too obnoxious.


A few weeks ago I was cruising around Craigslist and came across this sofa. I thought it was super fun and the price was right. Only $150. We went to check it out. I feared it would be bad quality. But it’s not. Very sturdy and in great shape.


Next up we have several spray painted items. I have an entire array of spray paint colors in my garage. It’s amazing what spray paint can do to an old ugly lamp, or how fun it can make a big framed mirror. The mirror and blue lamp are painted with a color called Ocean Breeze. I love the color, but the Krylon paint didn’t work out so great for me. It cracked and bubbled on both the mirror and the lamp. But you can’t tell from a distance, so I went with it. If someone notices, oh well!  Now that I think about it, someone did notice.  She thought I crackled it on purpose.  Lets go with that theory!


The green lamp is painted with Rustoleum Green Apple.


 The TV tray is painted with Rustoleums Warm Yellow. 
Not my fav shade of yellow, but I haven't taken the time to repaint it yet.


The floor lamp is Rustoleum Apple Red.
Love it!


I’m still thinking about painting these two little metal tables on the ends of the couch.
I’m thinking red. What do you think?


This wall has Goodwill and clearance finds. The family sign is from Goodwill. The star & compass were clearance from Hobby Lobby.  The M is a Hobby Lobby 50% off deal. 


This is Dennis’ Father’s Day gift. I took CD covers to artists that we both love, concerts that we went to, or any other music that is meaningful to us in someway. I painted this 20” x 20” piece of MDF with an army green paint sample that I found on the oops rack at Home Depot for $.50. Then I copied the CD covers and mod podged them to the board. Rubbed some stain, that I also found on the oops rack, into the cracks between the paper to give it kind of an aged/grunge look. Then I sanded the edges a bit to give it more of that aged/weathered look. Dennis loved it.  And the other print is an Etsy find.  Love Etsy!


I bought this canvas a while ago to use for another purpose. But for some reason that I can’t remember, I never used it. Then I tried wrapping fabric around it for my bedroom, but couldn’t find the right fabric. So I was left with thie 20” x 30” blank canvas. I decided I was going to try to paint something fun on it. I haven’t painted anything since High School. But I loved doing it. It was fun to create like that again. It’s just simple. But it has that whimsical feel that I love.  (This canvas was in another location in one of the pictures above.  I have moved things around alot to figure out where I best like things.)  (Oh, and those picture frames, I don't know the people in the pictures.  Those are the cool people that came with the frame.  I haven't taken the time to add my own pictures yet.  You know I have so few pictures to choose from!)


This is another fabric wrapped board. I actually bought that fabric for a dress for Peyton. But she informed me that “My not like that fabic Mommy.” Since she didn’t want a dress made with it, I came up with another use for it. Simple but fun. At least I think so anyway!


I have been looking for new rugs for this room and hadn’t been able to find a runner that I liked. I needed something colorful. So I decided to just sew a couple of rag rugs together to make one long one for the space that I needed a runner. Easy and cheap rug. I have no idea how long it will last, but for $15 for the 3 rag rugs, it was worth giving it a try.


This is more fabric. Apparently I have a thing for fabric. This time I spray adhesived it to poster board and then framed it. This was an ugly yard sale frame that I, you guessed it, spray painted. Again, simple and cheap.


Pillows were placemats that I opened up the seam in one end, filled with pillow stuffing, and sewed back up. I think the place mats were about $2 a piece. All on clearance of course.


The curtains are Ikea Vivan curtains. Super cheap too. $15 for the pair.
Roman shade was a clearance item from Lowes.


Chair was on clearance at Old Time Pottery.


So I think that is everything in this room. I'm pleased with how it turned out. 
So what are you working on these days?  Any re-decorating going on in your home?

Stop by and see some more fun projects at:


and
Domestically Speaking
 
Also, I was lucky enough to be featured over at 

 
Stop by and check out some other projects posted there!


July 21, 2011

Family Room Board & Batten | Sunbury Photographer

So the family room is finally finished. Well finished for today. I think it will be one of those rooms that changes a little here and there. As I find new things that I love and try to incorporate them in some way. But the major stuff, like painting and the board & batten installation, are finished.
So let’s start with that. The board & batten. It’s not hard at all to install this stuff. It’s just a few, time consuming, little steps. But it makes a BIG impact on the look of a room. We love how it turned out.

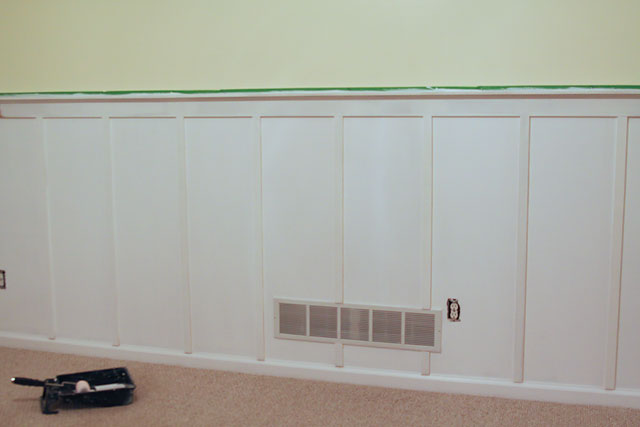
So lets get started.  First we painted the upper section of the walls the yellow color that we FINALLY decided on, and the lower half white in preparation for the board and batten treatment.


Then we had to cut several 3 ½” wide pieces of 8’ MDF for the top rail and the shelf. Then we also cut several 1 1/2” wide, 46” tall, strips of MDF for the vertical pieces. We only needed 2 – 4’x8’ sheets of MDF to do the entire space. And we still have some left over for other projects. I believe they were around $20 per sheet. So not very much money for all this awesomeness!
OK. So my first piece of advice if you decide to do this in your home, DEFINITELY take your saw OUTSIDE to cut the pieces. MDF causes A LOT, like TONS, of saw dust. And not just a little pile on the floor under your saw. I mean saw dust on everything within a 20’ radius of the saw. How do I know? Because we did not cut ours outside, we cut ours in our garage, and now I have ½” of dust on EVERYTHING in my entire garage. A HUGE mess!


After we cut all of our pieces, we installed everything with a nail gun. You don’t have to have a nail gun. You could also install it with a hammer and nails. It will just take a little more time for the installation.


We spaced our boards 14” apart. Except for places that we had to work around an outlet, window, or door. We hung them in whatever manner looked best for the area.


After installing the vertical and horizontal boards, we also installed a ledge and a piece of molding to sort of finish out the look.

This little ledge makes it so easy to prop things for decoration in an area to see if you like it there without having to actually put holes in your walls. And it’s nice because you can move things around or add new things whenever you like without having to repair and paint nail holes all the time. (I have already taken advantage of this little perk multiple times!)
After installing all the boards, I filled the nail holes with spackle and caulked all the seams (actually my girlfriend, Susan, caulked all the seams.  I have a picture of her helping me, but she would probably kill me for posting it!). Then I painted two coats of white semi gloss paint to finish it up.


I’ll be back soon with the rest of the room re-do’s.

So what do you think?  Think you might like to try this somewhere in your house?  I guarantee you will love it!

Related Posts Plugin for WordPress, Blogger...